With a new blog comes a new feature. We will be occasionally having a guest blogger join us here at Miss Crafty Pants. I am so excited to announce that Sumo will be our first ever guest!
Hello fellow crafty pants!
I'm Summer, or Sumo as my husband lovingly calls me. (And now consequently has all of my family calling me. Doesn't Aunt Sumo have a nice ring to it?)
 I use my blog to share my projects, tutorials, recipes, host giveaways, and shamelessly promote my etsy shop!
I AM:- married to my best friend
- daughter and sister to the best family ever
- friend to some of the greatest people out there
I LOVE TO:
- play piano
- sing- read
- craft
- go on walks
- spend time with my family
- drink Diet Coke
- bake/cook
- exercise (well, sometimes)
- crochet
SOME OF MY FAVORITE THINGS:
- Diet Coke
- popcorn
- chips and salsa
- anything that involves peanut butter and chocolate
- public library
- fall
- craft stores
- black and green
- Christmas
- historical fiction
- cats
Erika and I decided to share a tutorial with each other's readers today, so you are so lucky to get my easy sewing project. I just barely got a sewing machine for Christmas!
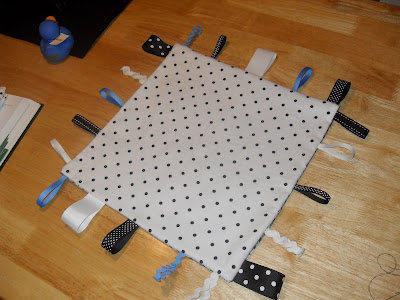
This was my second sewing project, which I did all by myself, and I am so happy with how it turned out! It was a gift for a baby shower. Reece (my daughter) had a tag blanket that my mom made, and she just loved sucking on and feeling the different ribbon sizes and textures. I think it's a fun idea, and thought I'd try my hand at it!
What you need:
- fabric (I used two different patterns and I used flannel)
- ribbon - all sizes and textures
I wanted the tag blanket to be about 15"x15", so I measured and pinned 15 1/2" x 15 1/2" on my fabric.
Cut it out.
Do this for both fabrics.
Cut your ribbon to the lengths that you want them. You will be looping them over.
On the right side of one of your fabric squares, pin as many ribbons as you would like. I didn't measure these. Living on the edge!
Sew along the edge a 1/4" hem. The ribbon can slide easily so be careful!
Do this all the way around your square of fabric.
Pin on the other square of fabric, having the right sides facing together and facing in.
Sew around the edges as 1/4" hem. Be careful to tuck your loops out of the way so that they don't get caught in the hem.
On the last edge leave a space to pull your fabric through.
Cut your corners, being careful not to cut your stitches.
Pull your fabric through, and pull your corners out. I ironed mine to get the hem all the way pulled out so that it wasn't folding in towards the center. (That made sense, right?)
Blind stitch your hole closed.
Finished! I think it turned out pretty cute!
I love making new blogging friends, so come on over to Sumo's Sweet Stuff! You can find something different each day:
- Market Yourself Monday: I share my latest projects and invite you to link up yours!
- Tutorial Tuesday
- Mouth-Watering Wednesday
- Things to Try Thursday
- Feature Friday
Thanks to Erika for letting me swap blogs with her! I've just loved getting to know her a little bit better and think she's pretty great!
Have a good weekend!


 Minky Blanket
 This weeks tip/tutorial is how to sew a minky blanket. Although the tutorial is not mine, I'm sure you will find it just as helpful.