Showing posts with label My Tutorials. Show all posts

Tuesday, April 19, 2011

Make a custom blog link icon for iphone/ipad/ipod

That's quite the title....I know! But I didn't know what else to call it.
Once you figure out how to do this, you'll be filling up your iphone/ipad pages with blog icons galore!

1.Create an icon/logo in your favorite photo editing program (PSE, PS, Gimp, Etc.). It will need to be 45 px by 45 px with a resolution of 72 pixels/inch. Now save it as a PNG, JPEG, or GIF.

2. Here's a sample of mine.
3. Go to Photobucket or any other image hosting website of your choice. Copy the "Direct link" to your image. You'll need the direct link code saved for later when you enter it into your blog html code.

4. Log into blogger. In the dashboard click "Design".
5. Click on Edit HTML

6. Towards the top of your HTML should be text . (It's around the 7th line, give or take).

7. Directly underneath the line head , type this code.
8.Replace IMAGE URL (DON'T erase the quotations) with the "Direct Link" code that you copied in step 3.

9. Press "Save".
10. Open your blog or webpage on your iphone/ipad/ipod etc. Press the + key on the bottom of your page. Next click "Add To Home Screen".

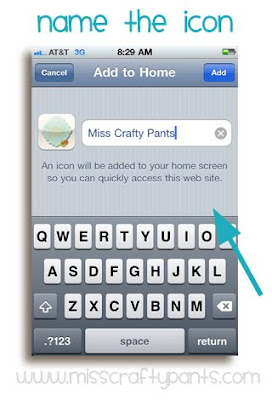
11. Your icon should now appear. Name your blog. Then press "Add" on the top right corner of your screen.
12. You should now be able to see your custom icon!!!
*If you want to try it out, you can go to www.misscraftypants.com on your iphone/ipad and follow steps 10-12 above to see if my icon will show up.
*A special thanks to Bright Sunshine Designs for the original tutorial.


Tuesday, March 29, 2011

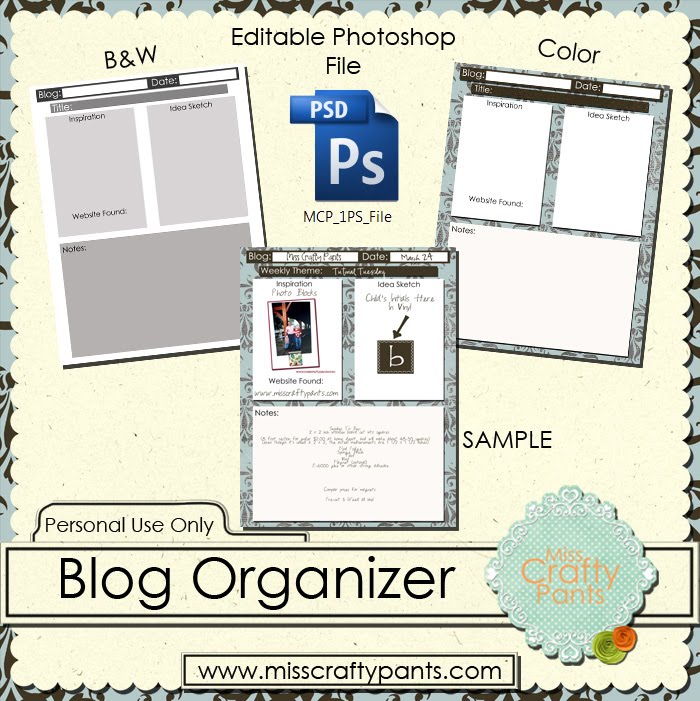
Free Blog Organizer Download


It's been a while!

Life has taken over and my personal fun time has been limited.

But here I am with a free blog organizer kit download. I know many of you are inspired by others, but like to put your personal spin on the craft, so this helps you document and serve as a reminder to help you in your creative en devours.

Monday, January 31, 2011

iphone won't charge? Possible Solution.

My ancient iphone has been pretty good to me over the years! I thought it was a goner when my battery wouldn't charge. When I plugged in my phone the charge icon would light up like it was charging, but then it would disappear. If I took out the USB cord on my phone the icon was red and showed a small percent of battery left. Frustrating!! I tried plugging it into my computer,tried a different cord, turned it off and on. Nothing!

Normally I would be ecstatic that a older electronic gadget of mine went kaput (so I could get a new one), but I really don't use my phone much. (HATE talking on the phone.)

I googled my problem and found my solution. Yes...it was a simple one. So this is for those of you out there who think it's the end of the world when this happens.

How to hard re-boot iPhone:

  • Hold down the power button (see picture above) and the home button (see picture above) at the same time.
  • Now, hold both buttons down at the same time until your iPhone reboots. (Your iphone will reboot when you see the screen flicker off.)
  • Push the power button on the top of your iPhone until it turns on.
  • Plug your iPhone back into your charger.

It should work! If not...google the problem, or spoil yourself and purchase a new one!

Tuesday, November 30, 2010

Vinyl Lettering Stencil Tutorial


I bought my vinyl plotter back in 2004 as a buisness venture, and have never looked back since. I've enjoyed all the fun projects and personal use I've gotten out of it.

Now days they've made the cricut and silhoutte thousands of dollars cheaper then my plotter, so I know more people own these. So...now you can find an inexpensive way to personalize clothing without the painful process of cutting out a freezer paper stencil with an exacto knife. YAY!

If you try this tutorial, please send picts! I'd love to see what you create!

Wednesday, September 29, 2010

Faux Caramel Apples


I made these last year and realized I never posted about them. Enjoy the tutorial!

Supplies:

-Wax paper
-Styrofoam Apples
-Tan (Caramel Color) craft paint
(I also had a dark brown color on hand just incase the tan was too light)
-Mod Podge
-Popsicle Sticks
-Disposable Plastic Cup
-Plastic Spoon
-Clear Acrylic Spray
Optional:
Corn cob litter (found in the pet section)
Tutorial:
1. Insert Popsicle sticks into the tops of the apple.
2. Place apples on top of the wax paper.
3. Mix Mod podge (about a 1/2 disposable cup full) and a few teaspoons of craft paint together until well mixed.
(This is not an exact measurement, this just worked for me.) If you need to add a little more paint to darken the color, do so now).
4. Spoon the mod podge mixture over the top of the apple, and let it drip down the sides of the apple.
5. Sprinkle the corn cob litter on top of the apple, and a little on the sides.
6.Let it dry (Mine took several DAYS because the mod podge pooled up at the bottom of the apple. I liked the look of it, but I'm just warning you that if took a LONG time to dry).
7.Once the apple is completely dry spray the shiny acrylic spray over the top of the apple.
8. Let dry
9. Wrap in a clear cellophane (to make it look like a real caramel apple).

Enjoy!


Thursday, April 22, 2010

Coupon Book Tutorial


Last week I blog swapped with the ladies from "Sisters Stuff" and this is what I shared. For those of you who missed it, here you go!


Re-fashion and re-purpose your old photo album!
Old Photo Album
Fabric
Mod Podge
Sponge Brush
Pre-printed dividers
Cardstock

Start by measuring and cutting your fabric just larger then your photo album.

Apply mod podge on the the top of the album. Apply small amounts of mod podge around the edges and the lip of the book. Press your fabric into place and smooth out any creases or bubbles. Place clips around the corners to help hold the fabric into place.

While waiting for that to dry, I printed the wording "Coupons" on canvas paper for the cover of my book. Once the mod podge was dry I decorated the front of my book.
Next, cut a piece of heavy duty cardstock to fit the inside cover. Mod Podge the cardstock to the inside cover. Repeat this step for the other side.

Make labels for the categories you wish to divide.


Organize those coupons and enjoy your new and improved photo album!

Wednesday, April 21, 2010

Magnetic Photo Blocks/Photo Block Stands


I was inspired from this post from Pin & Paper. Pin & Paper was inspired from this post from Plum Pudding. So I guess I can thank Plum Pudding for the original idea, and Pin and Paper for her crafty spin on it.

These can either be made into magnetic picture blocks, or picture block stands. The photo below is an example of both.


  • 2 x 2 inch wooden board cut into squares
(8 foot section for under $2.00 at home depot, and will make about 48-50 squares)
(even though it's called a 2 x 2, the actual measurements are 1 1/2 x 1 1/2 inches)

  • Mod Podge
  • Sponge Brush
  • Scrapbooking paper
  • Paint
  • Primer (Optional)
  • Pictures
  • Magnet (optional)
  • E-6000 glue or other strong adhesive

  • Measure and cut the wood at 1 1/2 inches. Repeat as necessary.
  • We used a band saw to cut the notch on the top of the block. Cut 1/2"-3/8" of an inch deep (This is where your picture will sit).

  • Sand until smooth.
  • Prime if desired (we do, the paint seems to adhere better). Let dry.
  • Paint the block your desired color. Dry completely.

  • If you are making this into a magnet, use the E-6000 glue to attach the magnet to the back of the block. Please allow sufficient time to dry.
  • Cut out your scrapbooking paper to fit on the front of the block.
  • Mod Podge the paper to the front of the block. Let dry.
  • I sanded the edges of the block to give it a distressed look. Then I used an antiquing ink stamp pad to distress the edges further.
  • If you have an embellishment or other wood shapes you'd like to attach to the front, do so now.
  • Add your picture to your block.

Thursday, March 18, 2010

St. Patricks Day Treasure


We had a visit from a few sneaky little Leprechauns yesterday.
They turned the milk green. The turned the toilet water green. They turned our food green. But that's O.k. the we didn't mind. They made up for it by leaving a treasure of candy and real dollar coins.

You can find the recipe for the Bread Bowls and Pasta Broccoli Cheese Soup HERE. {Just add food coloring to make them green)


You can find the recipe for the clover rolls on my cooking blog HERE.

Monday, March 15, 2010

Chocolate Mint Dipped Oreos


1 Bag Oreo's
1 bag Wilton Green Candy Melts Chocolate
Peppermint or Mint Extract
  • Pour the chocolates into a microwavable safe bowl. Put your microwave power at 50%. Cook for 1 minute. Stir. Continue microwaving in 30 second intervals until the chocolate is melted.
  • Stir in a few drops of mint extract. Stir well.
  • Dip the oreo's halfway into the chocolate.
  • Lay oreo's on wax paper. It'll take a few hours for the chocolate to harden again.

Tuesday, March 9, 2010

Letter Gallery Knock Off


I've fallen in love with the "Letter Gallery" portraits. I just couldn't justify spending $130
(ON SALE) for something I could create myself.

So I did some searching online and found this fun website where you can spell with picture letters. It's simple to use. Just type in what you'd like to spell, then click "Spell". They will come up with random picture letters from Flickr. If you are unhappy with the results they found for you, simply click on each letter until you're happy with the results.
They will provide you with a blog code if you'd like to import it into your blog.


I actually took it a step further because I wanted a higher quality photo to enlarge. I found the code to the original source by looking in the "Blogging code" section {you'll see something like this} http://www.flickr.com/photos/63943575@N00/3753496094. Copy the copy and paste into a new browser. You'll be able to find the original source of the photo. I emailed the photographer for permission to copy and print. Most photographers are just fine with you copying the picture as long as you're not reproducing it or profiting from it in any way. But it's always best to ask.

I measured the inner dimensions of my frame and popped those sizes into photoshop. Then I designed the canvas including the letter pictures and our names.

If you are interested in purchasing a professional "Letter Gallery Portrait" you can find one
HERE.

Friday, February 5, 2010

Silhouette Tile Sign


4" tiles
White Vinyl lettering Words: Love, Cherish, Adore (If you need this please contact me)
Adhesive Glitter paper
Pre-cut Silhouette
Epoxy Resin
Paint
Popsicle Stick
Soup can
Straw

  • For my silhouette I took a side shot of each of my children. I know there are easier ways to do this...but I have other uses for the silhouette. So I used my pen tool in photoshop and traced around the silhouette actually turning it into a custom shape. Then I re sized the silhouette to fit the tile.
  • Print and cut the silhouette.
  • Cut, sand, and paint a piece of wood to fit your tiles. ( Mine ended up being 6" x 15")
  • Trace your tile onto the glitter paper. You'll need one cut per tile.
  • Since the glitter paper was already adhesive, I just pressed it down onto the tile.
  • Sand the excess glitter paper (I used a belt sander) off the tile.
  • Use a heavy duty glue to adhere the silhouette onto the glitter paper. (I used mod podge at first, but it didn't adhere to the glitter very well.)
  • Make SURE the silhouette is glued well and the corners don't stick up.
  • Mix your epoxy resign according to package directions. Usually it's a two part mixture. (You wont need much mixed)
  • Prop your tiles up on a can of soup.
  • Slowly drizzle about a teaspoon amount of resign on each tile. Start spreading it around with a Popsicle stick. Add more resign as needed. It won't need very much.
  • As the resign starts to dry it will spread. If you put too much on it will run off the sides of the tile. You'll need to make sure to run a Popsicle stick underneath the tile to scrape the excess resign. DO NOT leave any amount of resign on the bottom of the tile.)
  • Slowly blow through the straw to pop the tiny bubbles on the tile.
  • Once again check to make sure the resign isn't on the bottom or sides of the tile.
  • After 24 hours you can glue the tile to the board and add your vinyl lettering.


***If you make this I'd love to see how yours turn out.****


Tuesday, February 2, 2010

Corner Bookmark


This is the first "Try A Tutorial Tuesday"!! Yea!!!
What is "Try A Tutorial Tuesday" you ask? It's where you:

1. Try a craft tutorial
2. Site and give links as where to find the original tutorial
3. Tell us how you put your own spin on the tutorial

*You may not re-post the tutorial on your blog. They have done all the work and you can re-direct your readers to their blog. Let them know they've been featured! They'll love it I'm sure!
If you feel you have changed the project so dramatically and you've altered it enough that you feel it no longer resembles theirs...{use at your discretion.}
then you can t post the tutorial on your blog.

  • If it weren't for her picture tutorial I think I'd have been a little confused. But because of her fabulous step by step pictures I was able to figure it out.
  • I basically followed her directions, except I used a double sided scrapbook paper. So I didn't need to glue a contrasting paper to the bottom. She used a beautiful stamp on her triangle, but mine is basic and plain. I felt the word "Read." said it all.
*If you were featured, be sure to grab a button

Monday, February 1, 2010

Valentines Mini Mailbox


Mini Mailbox (I got mine in the dollar section at target)
2 pieces of contrasting scrapbooking paper (one needs to be a 12 x 12)
Ribbon
Stickers
Mod Podge
Scissors
"You've got mail" computer print out
Antiquing Ink
  • Cut a 12 x 12 scrapbooking paper into a 4" x 12" strip.
  • Antique the edges of the paper (if desired)
  • Measure the paper around the mailbox and lightly sketch onto you paper where the mailbox flag will be.
  • Cut a U-shape out of the paper

  • Take the ends off the mailbox.
  • Quickly mod podge the paper to the mailbox. (The paper will overlap just a little on the bottom)
  • Trace the mailbox end on the coordinating paper. Do this for both ends. Cut out the paper. Ink the edges.
  • Mod podge the paper to the mailbox ends.
  • Print "You've got mail" in your photo editing software or word program.
  • Glue or mod podge the "You've got mail" print onto the mailbox ends.
  • Add additional ribbon, stickers and embellishments to add to your beautiful masterpiece!

My daughter made little envelopes to fit inside the mini mailbox. She's been leaving us daily valentines! What a sweety!

Thursday, January 28, 2010

Valentines Day Tile Picture


*My project I did using a digital scrapbooking kit

{Credits: "A Year Of Memories.February" By: Dani Mogstad & Shawna Clingerman}


Tile Projects Included in your download


Items Needed:
6" x 8" Tile (found at Home Depot or Lowes for a few bucks)
Pre-Printed digital scrapbooked picture
(Or you can use a picture and regular scrapbooking paper)
Mod Podge
Sponge Brush
Sandpaper

Optional:
Acrylic Texturing Gel
Plastic Grocery Bag

Step 1: Hopefully you're familiar with a photo editing program to use the download. Just simply drag and drop your picture behind the pre-made template included in the download. It was made to fit a 8 x 6 tile. Then you can drag and drop your photo to a 8 x 10 template for printing.

Step 2: Print your photo
(I print mine at Sams club. The colors have less of a chance of bleeding when adding the mod podge when using professional photo paper.)

{ If using photo and scrapbooking paper, gather supplies.}

Step 3: Trim excess photo paper to fit 8 x 6 tile.

Step 4: Quickly brush mod podge onto the tile. Firmly press your picture onto the tile. Let it dry.
{If it bubbles, wait a few minutes then press the picture down}

Step 5: Once the photo tile is dry sand the excess paper off the edges. I LOVE the look it gives. It looks as though the picture is flush with the tile.

{Idea: add distressing ink around the edges for an antiqued look}
Optional:
Dip a small corner of a crumpled plastic bag into the Acrylic Texturing Gel. Dab the gel onto the tile until you get the desired look. Let dry overnight.


Crafty Gals

More Crafty Gals

Even More Crafty Gals!

  © Blog Design by Simply Fabulous Blogger Templates

Back to TOP