


 3D Photo Collage
Today we have Michelle from Land of the Misfit Toys. I recently came across her blog and have been in love ever since. I almost feel like family, as I was anticipating the arrival of her baby girl just as a family member would have. (She is soooo adorable BTW).
Michelle has tons of other crafty tutorials posted on her blog, so be sure to visit and say "Hi".
Hello Miss Crafty Pants readers!!!!
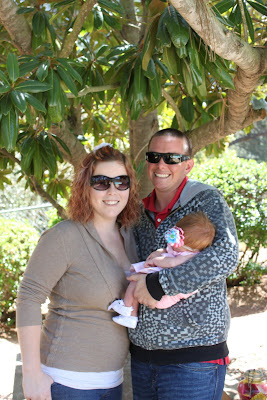
I am so excited that Erika let me take over her blog today! I am Michelle from Land of the Misfit Toys where I document my family's life as well as my slightly out of control craft addiction. My husband and I have been married for just over a year now but have been together almost 7 years and I just gave birth 12 weeks ago today to our very first, beautiful baby girl, Avery Blayke. I used to be a Preschool teacher but now I am finding that I love nothing more than to being a stay at home mom and taking care of my family. Also, my husband and I are caregivers to a wonderful young gentleman with Fragile X, a form of austism, who lives with us and we have known for years. But my blog title comes from our crazy group of 2 dogs and 5 cats that all are misfits in their own right, they are all rescues that have found their way to our home; because we can't say no to a cute face.
 But enough with the pictures and stories, because really, I could go on all day... On with the craft!!!
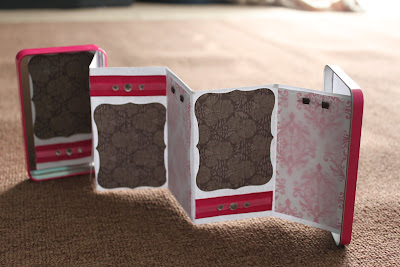
I made a 3D photo collage frame from some simple card board boxes I got at the craft store-

that cost me a total of 4$ and came out like this:

Here is what you need:


First I painted all of the sides of the boxes and lids with the brown acrylic paint.

Then I cut my scrapbook paper to fit the boxes and lids, I did the lids with the brown polka dot paper and the boxes with the stripes. I attached the paper with the Mod Podge to the top of the lids and bottom of the boxes.

Next I played around with the layout, I started with one size and shape because I wanted to explore the idea, but many shapes and sizes of boxes and lids could be really interesting to try next time.

Once I found a layout I liked, I looked for the pictures I was going to add and cut them down to fit the boxes which was 3.5 inches square for my project. You could treat this like a big scrapbook page with journaling and embellishments but I chose to go the simple route and treat it like a picture frame.

Then I hot glued the boxes together; I did the top and bottom rows separately, then attached the middle boxes to the top row and last, the bottom row to the middle. Next came the pictures, these I also hot glued on.
That's it! Easy, huh?!
Here are some other projects I have done:

Ribbon Storage Box (from a shoe box).
Mini Scrapbook or Brag Book (using a gift card tin).

Tons of Bows.

Cards and Invites.

Party Favors like Covered Candy Bars,
and more! I love trying new projects and using new materials, I can't wait until my baby can craft with me!
Michelle has tons of other crafty tutorials posted on her blog, so be sure to visit and say "Hi".
Hello Miss Crafty Pants readers!!!!
I am so excited that Erika let me take over her blog today! I am Michelle from Land of the Misfit Toys where I document my family's life as well as my slightly out of control craft addiction. My husband and I have been married for just over a year now but have been together almost 7 years and I just gave birth 12 weeks ago today to our very first, beautiful baby girl, Avery Blayke. I used to be a Preschool teacher but now I am finding that I love nothing more than to being a stay at home mom and taking care of my family. Also, my husband and I are caregivers to a wonderful young gentleman with Fragile X, a form of austism, who lives with us and we have known for years. But my blog title comes from our crazy group of 2 dogs and 5 cats that all are misfits in their own right, they are all rescues that have found their way to our home; because we can't say no to a cute face.

 But enough with the pictures and stories, because really, I could go on all day... On with the craft!!!
I made a 3D photo collage frame from some simple card board boxes I got at the craft store-

that cost me a total of 4$ and came out like this:

Here is what you need:
- 4 (or more) small cardboard boxes
- Sponge brushes
- Paint in the color of your choice
- Mod Podge
- Scrapbook papers
- Pictures
- Hot Glue


First I painted all of the sides of the boxes and lids with the brown acrylic paint.

Then I cut my scrapbook paper to fit the boxes and lids, I did the lids with the brown polka dot paper and the boxes with the stripes. I attached the paper with the Mod Podge to the top of the lids and bottom of the boxes.

Next I played around with the layout, I started with one size and shape because I wanted to explore the idea, but many shapes and sizes of boxes and lids could be really interesting to try next time.

Once I found a layout I liked, I looked for the pictures I was going to add and cut them down to fit the boxes which was 3.5 inches square for my project. You could treat this like a big scrapbook page with journaling and embellishments but I chose to go the simple route and treat it like a picture frame.

Then I hot glued the boxes together; I did the top and bottom rows separately, then attached the middle boxes to the top row and last, the bottom row to the middle. Next came the pictures, these I also hot glued on.
That's it! Easy, huh?!
Here are some other projects I have done:
Ribbon Storage Box (from a shoe box).
Mini Scrapbook or Brag Book (using a gift card tin).
Tons of Bows.
Cards and Invites.
Party Favors like Covered Candy Bars,
and more! I love trying new projects and using new materials, I can't wait until my baby can craft with me!
Thanks Erika for inviting me!


Hi Michelle!
ReplyDeleteCute, cute project. I love how that turned out. You are amazing.
thanks for having Michelle on, she is the sweetest girl!
XOXo
jen
I LOVE your box picture idea!! Thanks for sharing!
ReplyDelete